
IMPORTANT NOTE: This article is for Arduino IDE version 1.6.6 (or above). To add a USB Game Controller to an Arduino Leonardo or Micro using Arduino IDE version 1.6.5 (or below) see the following postings: Add USB Game Controller to Arduino Leonardo or Micro and Add Up To 3 USB Game Controllers to Arduino Leonardo or Micro.
Introduction


- X, Y, and Z axis
- 32 buttons
- X, Y, and Z axis rotation
- Rudder
- Throttle
- 2 Point of View Hat Switches
Installing the Library
The latest version of the Arduino library that allows the Arduino Leonardo and Micro to appear as a Game Controller can be downloaded from the following GitHub repository:https://github.com/MHeironimus/ArduinoJoystickLibrary/tree/version-1.0
This GitHub repository actually contains three different versions of the Arduino Joystick Library:
- Joystick - Causes the Arduino to appear as single Game Controller
- Joystick2 - Causes the Arduino to appear as two, simple Game Controllers
- Joystick3 - Causes the Arduino to appear as three, simple Game Controllers
Copy the Joystick (and/or Joystick2 and/or Joystick3) folder from GitHub to the Arduino Libraries folder (typically located at %userprofile%\Documents\Arduino\libraries). The library (or libraries) should now appear in the Arduino IDE list of libraries.
Running the Test Sketch
Included in the library is a test sketch, called UsbJoystickTest.ino (or UsbJoystick2Test.ino or UsbJoystick3Test.ino). This sketch should be loaded, compiled, and uploaded to the Arduino Leonardo or Micro using the Arduino IDE (version 1.6.6 or above).
The following steps are for Windows 7. If you have a different version of Windows or a different operating system, these steps may differ.
Go to the Windows Control Panel and select “Hardware and Sound”.

Then select “Devices and Printers”.

The Arduino Leonardo or Arduino Micro should appear in the list of devices.

Next right mouse click on the Arduino Leonardo or Arduino Micro to display the settings menu.

Select “Game controller settings” to get to the “Game Controllers” dialog.

The Arduino Leonardo or Micro should appear in the list of installed game controllers. Select the Arduino Leonardo or Micro and click the Properties button to display the game controller test dialog.
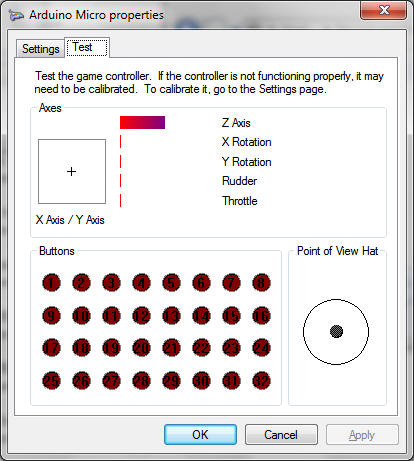
While this dialog has focus, ground pin A0 on the Arduino to activate the test script. The test script will test the game controller functionality in the following order:
- 32 buttons
- throttle and rudder
- X and Y Axis
- Z Axis
- 2 Hat Switches
- X and Y Axis Rotation
Joystick Library API
Now that the Joystick library is available to the Arduino IDE, an Arduino Leonardo or Arduino Micro can be used for custom game controller projects. The following describes the complete Joystick library. The simpler library that is used for the Joystick2 and Joystick3 libraries is documented at the end of this posting.
Joystick.begin(bool initAutoSendState)
Starts emulating a game controller connected to a computer. By default all methods update the game controller state immediately. If initAutoSendState is set to false, the Joystick.sendState method must be called to update the game controller state.
Joystick.end()
Stops the game controller emulation to a connected computer.
Joystick.setXAxis(byte value)
Sets the X axis value. Range -127 to 127 (0 is center).
Joystick.setYAxis(byte value)
Sets the Y axis value. Range -127 to 127 (0 is center).
Joystick.setZAxis(byte value)
Sets the Z axis value. Range -127 to 127 (0 is center).
Joystick.setXAxisRotation(int value)
Sets the X axis rotation value. Range 0° to 360°.
Joystick.setyAxisRotation(int value)
Sets the Y axis rotation value. Range 0° to 360°.
Joystick.setZAxisRotation(int value)
Sets the Z axis rotation value. Range 0° to 360°.
Joystick.setButton(byte button, byte value)
Sets the state (0 or 1) of the specified button (0 - 31). The button is the 0-based button number (i.e. button #1 is 0, button #2 is 1, etc.). The value is 1 if the button is pressed and 0 if the button is released.
Joystick.pressButton(byte button)
Press the indicated button (0 - 31). The button is the 0-based button number (i.e. button #1 is 0, button #2 is 1, etc.).
Joystick.releaseButton(byte button)
Release the indicated button (0 - 31). The button is the 0-based button number (i.e. button #1 is 0, button #2 is 1, etc.).
Joystick.setThrottle(byte value)
Sets the throttle value. Range 0 to 255.
Joystick.setRudder(byte value)
Sets the rudder value. Range 0 to 255.
Joystick.setHatSwitch(byte hatSwitch, int value)
Sets the value of the specified hat switch. The hatSwitch is 0-based (i.e. hat switch #1 is 0 and hat switch #2 is 1). The value is from 0° to 360°, but in 45° increments. Any value less than 45° will be rounded down (i.e. 44° is rounded down to 0°, 89° is rounded down to 45°, etc.).
Joystick.sendState()
Sends the updated joystick state to the host computer. Only needs to be called if AutoSendState is false (see Joystick.begin for more details).
Joystick2 and Joystick3 Library API
The joystickIndex is 0-based (i.e. the first game controller has a joystickIndex of 0, the second has a joystickIndex of 1, and the third has a joystickIndex of 2).
Joystick[joystickIndex].begin(bool initAutoSendState)
Starts emulating a game controller connected to a computer. By default all methods update the game controller state immediately. If initAutoSendState is set to false, the Joystick[joystickIndex].sendState method must be called to update the game controller state.
Joystick[joystickIndex].end()
Stops the game controller emulation to a connected computer.
Joystick[joystickIndex].setXAxis(byte value)
Sets the X axis value. Range -127 to 127 (0 is center).
Joystick[joystickIndex].setYAxis(byte value)
Sets the Y axis value. Range -127 to 127 (0 is center).
Joystick[joystickIndex].setButton(byte button, byte value)
Sets the state (0 or 1) of the specified button (0 - 15). The button is the 0-based button number (i.e. button #1 is 0, button #2 is 1, etc.). The value is 1 if the button is pressed and 0 if the button is released.
Joystick[joystickIndex].pressButton(byte button)
Press the indicated button (0 - 15). The button is the 0-based button number (i.e. button #1 is 0, button #2 is 1, etc.).
Joystick[joystickIndex].releaseButton(byte button)
Release the indicated button (0 - 15). The button is the 0-based button number (i.e. button #1 is 0, button #2 is 1, etc.).
Joystick[joystickIndex].sendState()
Sends the updated joystick state to the host computer. Only needs to be called if AutoSendState is false (see Joystick[joystickIndex].begin for more details).
88 comments:
After a hard time setting my Pro Micro to do just the same as a original Micro (I thought it would be fully compatible but it turns out it takes some addons and stuff; then I bricked the board when I upload the sketch using the wrong processor voltage ... and so on). Finally I got to the point where the board is recognized as a game controller, the sketch test works 10/10.
Now comes the hard part: writing the code to really make it work as a game controller! Some questions:
-How to a get 32 buttons working with just 16 digital pins? How do I set them to go with the controller buttons?
-Do I have to initialize the communications with serial.begin?
-How do I connect the pots and assign them to the axis?
The best would be if anyone has a working sketch with just a few buttons and pots configured and working.
Thx in advance.
Sergio
Sergio C. asked -
> -How to a get 32 buttons working with just 16 digital pins?
One way to get large numbers of buttons wired up to a device that has limited input pins, is to create a key matrix. The following website explains them in details and should provide you with the information you need to know: http://pcbheaven.com/wikipages/How_Key_Matrices_Works/
Another option is to use a 74LS348 (8-LINE TO 3-LINE PRIORITY ENCODERS - http://www.ti.com/lit/ds/symlink/sn74ls348.pdf) or something equivalent to read in multiple inputs using only a few microcontroller pins.
> How do I set them to go with the controller buttons?
You will have to decode the value read in via your input pins and map it to the appropriate game controller buttons. I do something similar to this in my "Classic Joystick to USB Adaptor" (http://mheironimus.blogspot.com/2014/09/arduino-classic-joystick-to-usb-adaptor.html). I am mapping the value to keyboard keys, but the principal is the same.
> Do I have to initialize the communications with serial.begin?
Only if you are going to send data to the host computer via the serial port. It is not needed for pure joystick emulation.
> How do I connect the pots and assign them to the axis?
jakkul has some good examples of this on his blog: http://jakkul.blogspot.com/2015/06/my-first-arduino-racing-pad-video-and.html and http://jakkul.blogspot.com/2015/06/sim-racing-and-game-controllers-part-2.html
Good luck with your project,
Matt
I have an Arduino Leonardo and I downloaded the single joystick library. After putting the file in my libraries I ran the test, and it uploaded to my board fine, but when I go to devices to find my board its not there. So I opened my device manager and the board is showing up there, but still not in the devices. I have tried to unplug the board and plug it back in and reset the board, but nothing works. In the HID properties it says "Device started" "Device configured", and then it says "Device not migrated." I am using windows 10 i'm not sure if that matters. Please let me know if you can help me at all.
I see from your GitHub post that after rebooting you PC you no longer had the issue. Please post again if that is not the case.
Mine is working fine , and I've managed to code single buttons working 10/10. Havins some issues with the analog axys, but I think the pots I'm using are damaged, caude I get strange irregular readings. Still working on the matrix code to have all 32 buttons working. I am looking at this code (http://www.kevinpeat.com/Button_Box2.ino) but this is for the normal Leonardo/Micro without the Joystick function, so I have to understand how to use it here.
I'll post when I have developments.
It just won't work:
fatal error: HID.h: No such file or directory
#include "HID.h"
get this error with every libary
I#m using 1.7.8
Sascha H : I am not sure what you mean by "I#m using 1.7.8". The latest version of the Arduino IDE I am aware of is 1.6.7. Are you able to compile some of the simple, built-in Keyboard or Mouse samples that come with the Arduino IDE?
Hi Matthew,
thanks for sharing your code. It is working great!
I am using it with an old 6 dof serial spacemouse from logitech and a foot pedal for throttle control.
I do, however, encounter problems when using the zAxisRotation with joystick.h. No input gets recognized on this channel by directX. When using RawInput (using this handy tool http://www.planetpointy.co.uk/joystick-test-application/) the ZRotationValues are fine.
Do you have a clue?
Thanks a lot,
regards,
Jan-Peter
I have had another person comment that they have had issues with the z-Axis rotation in some situations also. I unfortunately do not have any additional information on this issue at this time. If I uncover any more information on this, I will be sure to post it here.
Thank you for your comments,
Matt
Hi Matthew,
I've got all 8 axes working now, by removing the Throttle and Steering section from the hidReportDescriptor completely and and adding two more analog axes after rx,ry and rz like so:
// X, Y, and Z Axis + 2 additional axes
0x05, 0x01, // USAGE_PAGE (Generic Desktop)
0xA1, 0x00, // COLLECTION (Physical)
0x09, 0x30, // USAGE (x)
0x09, 0x31, // USAGE (y)
0x09, 0x32, // USAGE (z)
0x09, 0x33, // USAGE (rx)
0x09, 0x34, // USAGE (ry)
0x09, 0x35, // USAGE (rz)
0x09, 0x36, // USAGE (slider1)
0x09, 0x37, // USAGE (slider2)
0x15, 0x00, // LOGICAL_MINIMUM (0)
0x26, 0xff, 0x00, // LOGICAL_MAXIMUM (255)
0x75, 0x08, // REPORT_SIZE (8)
0x95, 0x08, // REPORT_COUNT (8)
0x81, 0x02, // INPUT (Data,Var,Abs)
0xc0, // END_COLLECTION
Of course you have to adjust the sendState function accordingly...
Learned a lot about HID descriptors :-). Thanks for your project!
Regards,
Jan-Peter
Hi, Was wondering is there a way to add two analogue sticks on one controller? I have no C++ experience, so I'm not sure where to start on the joystick library to add another analogue stick
Council Of Ten - Yes, you can support 2 analogue sticks with one controller. The following website talks about how the HID Report Descriptor should look to support 2 analogue sticks: http://www.artekit.eu/stm32-usb-gamepad-interface/.
Hi again Matthew, thanks for your prompt reply, unfortunately, after reading that website and reading about HID Report Descriptor, I am still unsure on how to add a second analogue stick.
Which part of your HID Report Descriptor defines the analogue sticks? I'm assuming under the X,Y and Z axis. But even then I'm not very sure on which part exactly is different from yours and the wii's gamepad interface
Also, when changing the HID Report Descriptor, I understand I need to change sendState, do I just add on to the data array, and if so, do I need to write more methods like setXAxis and setYAxis?
Once again, thanks for your time.
It looks like the authors of the http://www.artekit.eu/stm32-usb-gamepad-interface/ article mapped the two analogue sticks as follows:
left_analog_x mapped to X Axis [i.e. Joystick.setXAxis(byte value)]
left_analog_y mapped to Y Axis [i.e. Joystick.setYAxis(byte value)]
right_analog_x mapped to Z Axis [i.e. Joystick.setZAxis(byte value)]
right_analog_y mapped to X Axis Rotation [i.e. Joystick.setXAxisRotation(int value)]
The way I have coded the library X, Y, and Z go from -127 to 127, but the X Axis Rotation value goes from 0 to 360. You will need to scale any analogue value you read from a pin to this range or modify the library to set the X Axis Rotation value the same way X, Y, and Z are set.
Hope this help,
Matt
I'm using your joystick library very well. Thank you for your effort.
One thing I wonder is,
I'm using over 2 joystick on 1 PC but sometimes 1P and 2P are changed.
Is there any walk around to solve this problem?
I think that it's good to give ID for each joystick..
I'm using windows 7.
Thank you in advance,
Jisuk Lee - Are you using two Arduino devices plugged into the same computer (i.e. using the Joystick library) or one Arduino that supports 2 joysticks (i.e. using the Joystick2 library)?
I have not seen the order of the Joysticks change when using the Joystick2 library.
The order that Joysticks are enumerated is determined by Windows (and is not always the same). There are quite a few posting on the Internet regarding this issue. Here are a few:
http://forum.unity3d.com/threads/how-does-windows-decide-which-joystick-is-1-which-is-2.86736/
http://www.tomshardware.com/answers/id-2446416/multiple-game-controllers-windows.html
http://forum.il2sturmovik.com/topic/11261-please-fix-joystick-id-issue/
http://answers.microsoft.com/en-us/windows/forum/games_windows_10/windows-10-is-changing-joystick-number-assignments/7502ce23-d30c-43e2-ab89-daa52f5af0eb?auth=1
Yes, I'm using two Arduino Leonardo because sometimes i have to change whole joysitck module from the PC. so as you expected i'm using Joystick library not 2 or 3.
I am using your joystick library code with a 5v "pro micro" board and a joystick pot.
Windows is able to see my 'joystick' fine as well as HTML5 joystick tester but when trying to use it with the "Condor Soaring Simulator", they do not seem to detect it when I try to assign a channel to custom joystick. (developer not responding...:(()
My Logitech extreme 3D pro as well as a saiteck joystick works just find.
Any ideas ? change values in HID descriptor ?
Doron B.Y. - Unfortunately this appears to be a common issue with this software: http://forum.condorsoaring.com/viewtopic.php?f=15&t=15272. Without a copy of the software to test against, I really do not know what is going on. I hope to have a new version of my library out in a few weeks. You can always test it against the new version of my library and see if it works any better.
Sorry I could not be more help,
Matt
Hi Mathews,
This guy in Denmark managed to get Condor working with a Leonardo board. See here :
https://www.youtube.com/watch?v=chZFKk43pyY
His code is here : https://github.com/ftoft/arduino-usb-joystiuk but it does not work with the current version of the Arduino IDE (1.6.9) and I am not sure which old one he used. I currently get a compile error.
If you get a change,can you please see if it sheds any light on the problem ?
Thx
Doron
Doron B.Y. - Based on his code, I would say it is for Arduino IDE 1.6.5 and below. It looks similar to the following: http://mheironimus.blogspot.com/2015/03/add-usb-game-controller-to-arduino.html.
It could be the version I talk about on this page is too complex for the game. I am still working on Version 2.0 of the Arduino Joystick Library, but it is probably far enough along that you could give it a try. You can get the alpha version at https://github.com/MHeironimus/ArduinoJoystickLibrary/tree/version-2.0. I still have some testing and a lot of code cleanup to do, but this version allows you to specify just what you need. Take a look at the examples for how to customize the library.
Matt,
I've been having a lot of fun trying out your earlier library and I just saw you have a new beta release of the Joystick Library that I'll be checking out today. One thing I've been trying to figure out is how to get multiple joysticks to have different names when they show up in the Game Controllers control panel applet in Windows.
For example, if I use your Joystick3 test sketch all three joysticks show up as 'Arduino Leonardo' which can be a bit confusing. Any thoughts on how to give them unique descriptor names?
Best regards,
Josh
@Josua Myers - I have not researched this, but I believe this could be done by creating a custom INF file (if you are on Windows). You can read about INF files here: https://msdn.microsoft.com/en-us/library/windows/hardware/ff547402.aspx. I have not tried this, however.
Great, thanks Matt. I'll look into it and see what I can come up with.
Josh
Hey,
Thank you so much for this library.
I was wondering, is there any way to get more than a byte of precision? It seems like such a waste if the arduino can read 1024 distinct analog values but you have to map that to 256, or at best 360 distinct values.
I made a steering wheel controller out of an old car's steering wheel, but I find that the precision is just not enough for the game I'm trying to play, Euro Truck simulator 2
@Xero - Try using the new Version 2.0.x of the Arduino Joystick Library (https://github.com/MHeironimus/ArduinoJoystickLibrary/tree/version-2.0). It has 16-bit precision and a few other new features you may like.
Oh! thank you! :)
Hopefully someone can help me here, I recently purchased an Arduino Leonardo R3 board for the purpose of operating 3 potentiometers and possibly some buttons as a game controller. I fallowed the instructions here on how to download the 3 joystick library files and copy them to my Documents>Arduino>libraries folder. I also made sure to use version 1.6.6 for the Arduino IDE. I have been able to load the Joystick library from the list of libraries however when I load the Joystick Test sketch from the list of examples and attempt to upload and verify there is a failure. I tries with Joystick 1-3 and the result is the same. This is the context of the failure:
Arduino: 1.6.6 (Windows 7), Board: "Arduino Leonardo"
In file included from C:\Users\Seth\Documents\Arduino\libraries\Joystick\examples\UsbJoystickTest\UsbJoystickTest.ino:9:0:
C:\Users\Seth\Documents\Arduino\libraries\Joystick/Joystick.h:31:2: error: #error The Joystick library can only be used with a USB MCU (e.g. Arduino Leonardo, Arduino Micro, etc.).
#error The Joystick library can only be used with a USB MCU (e.g. Arduino Leonardo, Arduino Micro, etc.).
^
exit status 1
Error compiling.
This report would have more information with
"Show verbose output during compilation"
enabled in File > Preferences.
I am very new to this so I have no idea what this means. I notice it says only the Arduino Leonardo and Micro can be used but since I am using the Leonardo this shouldn't be the issue right? If anyone can help point me in the proper direction that would be awesome! The most important thing to me is to find a sketch that will allow me to use 3 potentiometer inputs to run a set of sim racing pedals. The buttons are optional, however if I am able to get this test sketch working I would love to have the extra button inputs.
@Seth Cormier - That is the error you would see if you did not have the Arduino Leonardo or Arduino Micro selected, but, based on your error log, it looks like you did have the Arduino Leonardo selected. I would try upgrading to the latest version of the Arduino IDE (Version 1.6.12) and see if that fixes your issue.
Hi Matthew hi all
so far thanks a lot for the great joystick libary witch gives you up to 16 bit high precisson and is easy configurable
I have tested the joystick libary v. 2.0 with a arduino pro micro and soaring version 1.04 and 1.09
you can fly the playes with the joystick but in the game menue it gives you a error message when you want to look up the joystick settings. (sth. like device is not listed as direct input)
os is win7 pro 64-bit sp1
arduino code is:
#include
// Create the Joystick
Joystick_ Joystick;
void setup() {
// Initialize Joystick Library
Joystick.begin();
}
void loop() {
Joystick.setYAxisRange(0,1023);
Joystick.setYAxis(analogRead(A0));
Joystick.setXAxisRange(0, 1023);
Joystick.setXAxis(analogRead(A1));
delay(2);
}
now i have written an email to the condor soaring support as the problem seems to apperar with some other comercial joysticks too. hopfully wating for some answer
(solved)
Hi,
finaly i didnt got any answer from condor support.
usb joystick liabary 2.0 isn't working for condor yet.
here is a solution:
use the libary from this swedish guy from 2014, it is working with all versions of condor from 1.04 to 1.15.
https://www.youtube.com/watch?v=chZFKk43pyY use arduino ide 1.05 and follow the instructions from https://github.com/ftoft/arduino-usb-joystiuk now all my arduino joysticks are working fine with condor https://www.youtube.com/watch?v=B-Y6qciyOY4 u can use serial from g*e ;)
well, turned out, that the joystick libary 2.0 is working well with condor 1.15 (actual)
heres a working "code" wich u can use for 4-axis (e.g. elevator+aileron+rudder+airbrake ). for each axis you have a anaog input pin A0,A1,A2,A3 where you can connect some potentiometers or hall sensor. the most arduinos have 10 bit analog-digital converters. witch means that you get 2¹° = 1024 measurement values out of your sensor pin for 0-5 V range. the libary itself supports up to 16 bit sensor reading as i understood witch is way moore. 2¹⁶ = 65536 values. condor doesnt detect the joystick if you use "joystick" as joystick type and if "rudder" is set to true in the examle below. just figure out whats working- in my examle type "gamepad" and throttle/brake - "true" is working well. setting joystick type to multiaxis lets me control the mouse of my pc with the joystick - witch is really cool but not wanted (you could use this option too for controling condor, as you control condor by mouse as default !) i still dont know what exactly the joystick hid report and the joystick types are (e.g. whats the difference between joystic / gamepad and multiaxis?). for a delay value im not shure if it is necessary and if - what vlaue woud be good?
thanks a lot for the great libary !
#include
Joystick_ Joystick(0x03, //hid report id
JOYSTICK_TYPE_GAMEPAD, //joystick type
32, //button count
0, //Hsw 0-2
true, //x
true, //y
false, //z
false, //rx
false, //ry
false, //rz
false, //rudder
true, //throttle
false, //accelerator
true, //brake
false); //steering
void setup() {
Joystick.begin();
}
void loop() {
Joystick.setYAxis(analogRead(A0));
Joystick.setXAxis(analogRead(A1));
Joystick.setThrottle(analogRead(A2));
Joystick.setBrake(analogRead(A3));
delay(5);
}
1.st line #include Joystick.h , Joystick.h between <> wasn't printed in the blog corectly
Hello,
I just got Arduino Leonardo and trying to run your code (seems it will fit perfect for my project). But I have a problem with even starting it:
Arduino Leonardo,
IDE 1.7.11:
Arduino:1.7.11 (Windows 8.1), Płyta:"Arduino Leonardo"
In file included from UsbJoystickTest.ino:9:0:
Joystick.h:24:17: fatal error: HID.h: No such file or directory
#include "HID.h"
^
compilation terminated.
***********************************************************************
Arduino:1.6.6 (Windows 10), Płyta:"Arduino Leonardo"
In file included from C:\Users\sunrrrise\Documents\Arduino\libraries\Joystick\examples\UsbJoystickTest\UsbJoystickTest.ino:9:0:
Joystick.h:31: error: #error The Joystick library can only be used with a USB MCU (e.g. Arduino Leonardo, Arduino Micro, etc.).
#error The Joystick library can only be used with a USB MCU (e.g. Arduino Leonardo, Arduino Micro, etc.).
^
exit status 1
#error The Joystick library can only be used with a USB MCU (e.g. Arduino Leonardo, Arduino Micro, etc.).
Does your code require any additional nonstandard libraries?
Here is my libraries folder:
C:\Users\sunrrrise\Documents\Arduino\libraries>dir /s /b
C:\Users\sunrrrise\Documents\Arduino\libraries\Joystick
C:\Users\sunrrrise\Documents\Arduino\libraries\Joystick2
C:\Users\sunrrrise\Documents\Arduino\libraries\Joystick3
C:\Users\sunrrrise\Documents\Arduino\libraries\readme.txt
C:\Users\sunrrrise\Documents\Arduino\libraries\Joystick\examples
C:\Users\sunrrrise\Documents\Arduino\libraries\Joystick\Joystick.cpp
C:\Users\sunrrrise\Documents\Arduino\libraries\Joystick\Joystick.h
C:\Users\sunrrrise\Documents\Arduino\libraries\Joystick\examples\JoystickButton
C:\Users\sunrrrise\Documents\Arduino\libraries\Joystick\examples\UsbJoystickTest
C:\Users\sunrrrise\Documents\Arduino\libraries\Joystick\examples\JoystickButton\JoystickButton.ino
C:\Users\sunrrrise\Documents\Arduino\libraries\Joystick\examples\UsbJoystickTest\UsbJoystickTest.ino
C:\Users\sunrrrise\Documents\Arduino\libraries\Joystick2\examples
C:\Users\sunrrrise\Documents\Arduino\libraries\Joystick2\Joystick2.cpp
C:\Users\sunrrrise\Documents\Arduino\libraries\Joystick2\Joystick2.h
C:\Users\sunrrrise\Documents\Arduino\libraries\Joystick2\examples\UsbJoystick2Test
C:\Users\sunrrrise\Documents\Arduino\libraries\Joystick2\examples\UsbJoystick2Test\UsbJoystick2Test.ino
C:\Users\sunrrrise\Documents\Arduino\libraries\Joystick3\examples
C:\Users\sunrrrise\Documents\Arduino\libraries\Joystick3\Joystick3.cpp
C:\Users\sunrrrise\Documents\Arduino\libraries\Joystick3\Joystick3.h
C:\Users\sunrrrise\Documents\Arduino\libraries\Joystick3\examples\UsbJoystick3Test
C:\Users\sunrrrise\Documents\Arduino\libraries\Joystick3\examples\UsbJoystick3Test\UsbJoystick3Test.ino
OK, I can have a problem with my Arduino. I own original (not a clone) Arduino Leonardo from arduino.org. You use Arduino Leonardo from arduino.cc. Both are considered as original ones. I cannot compile your code using IDE from *.org because I am getting an error about lack of HID.h header and library. I cannot also compile your code using IDE from *.cc:
Arduino:1.6.12 (Windows 10), Płytka:"Arduino Leonardo"
C:\Users\SUNRRR~1\AppData\Local\Temp\ccha5X6S.ltrans0.ltrans.o: In function `main':
ccha5X6S.ltrans0.o:(.text.startup+0x164): undefined reference to `Joystick'
ccha5X6S.ltrans0.o:(.text.startup+0x166): undefined reference to `Joystick'
ccha5X6S.ltrans0.o:(.text.startup+0x168): undefined reference to `Joystick_::begin(bool)'
[lost of similar errors...]
ccha5X6S.ltrans0.o:(.text.startup+0x5a8): undefined reference to `Joystick_::sendState()'
collect2.exe: error: ld returned 1 exit status
exit status 1
Błąd kompilacji dla płytki Arduino Leonardo.
Phil.Pf586 - Glad to hear the library is working for you. The joystick hid report ids allow you to have the Arduino appear as multiple joysticks (instead of just one). I know that some programs will react differently to the joystick depending on what joystick type you use (i.e. JOYSTICK_TYPE_JOYSTICK, JOYSTICK_TYPE_GAMEPAD, or JOYSTICK_TYPE_MULTI_AXIS). For what I use the library for, it does not really matter what settings I use, but I know for other programs it does matter. Your best bet is to try them all and see which one gives you the behavior you are looking for.
sunrrrise - I am not sure why you are having that issue. That is usually the error you would get if you did not have the Arduino Leonardo or Arduino Micro selected (but it appears from your log that you did have the Arduino Leonardo selected). I have tested the library using the latest version of the Arduino IDE (Version 1.6.12 on Windows 7 and Windows 10 - https://www.arduino.cc/en/Main/Software). You could try reinstalling the Arduino IDE or give Version 2.0 of the library a try and see if that resolves your issue - https://github.com/MHeironimus/ArduinoJoystickLibrary/tree/version-2.0.
Hello Matthew!
I somehow managed to compile it! I removed all IDEs, both from .cc and .org, wiped all other files, libraries and so on and downloaded it once again. 1.6.12 works fine right now! However I have to use 1.6.8 cause I got another problem with compiling code for PCF8574. Fortunatelly 1.6.8 works with your code too :)
Thank you very much for you code, it is amazing and almost out-of-the-box!
Right now I have to write throttle design code using your code as a base extended by PCF8574 and oversampling libraries.
Hey Matthew!
This library is great. I think it's exactly what I need to make a control panel to interact with a flight sim but I'm just not there yet. I am a complete newbie but am slowly figuring this stuff out. What I am doing is wiring a 6 x 6 matrix of buttons with a Micro and will then add two potentiometers. I need the button presses to send keyboard keys to the PC. Some buttons for the function keys (F1, F2, etc.), some for each of the number keys 0 thru 9, and others. What I have done so far is the following but I would like to know if you have any ideas. It doesn't seem as though it should be that difficult and not as complicated as your "Classic USB Joystick adaptor".
#include
#include
const byte ROWS = 6; //six rows
const byte COLS = 6; //six columns
char keys[ROWS][COLS] = {
{'COM1', '1', '2', '3', 'DRIFTC/O', 'GAIN'},
{'COM2', '4', '5', '6', 'NORM', 'LEVEL'},
{'IFF', '7', '8', '9', 'WARN RESET', 'LEVEL'},
{'LIST', '0', 'RCL', 'ENTER', 'FLIR INC', 'WX'},
{'AA', 'DCS UP', 'DCS Right', 'WYPT INC', 'FLIR DEC'},
{'AG', 'DCS Down', 'WTPT DEC'}
};
byte rowPins[ROWS] = {7, 8, 9, 10, 11, 12}; //connect to the row pinouts of the keypad
byte colPins[COLS] = {1, 2, 3, 4, 5, 6}; //connect to the column pinouts of the keypad
Keypad keypad = Keypad( makeKeymap(keys), rowPins, colPins, ROWS, COLS );
void setup() {
Serial.begin(9600);
}
void loop() {
char key = keypad.getKey();
if (key != NO_KEY) {
Serial.println(key);
}
}
Thank you in advance for your time.
Gary
I think I may need to explain a little further as I know the code is a work in progress. If you look at the picture linked below you will see the hardware I plan on re-creating to interact with the PC through the Micro. When pressing the COM1 button it will be mapped to the F1 key. Other button presses will be similarly mapped to various keys from a key file. I have been trying to modify a 4 x 4 keypad library and code along with the joystick library for this purpose. I considered simply having the Micro emulate a keyboard but, if I understand correctly, doing so would make my keyboard useless unless I come up with a work around.
Gary
http://www.simpits.org/database/graphics/F16C_panels/F16C_ICP.jpg
@Gary Head - Your idea can be accomplished using an Arduino Micro. You should be able to use the Micro as both a keyboard and a joystick (I have done this successfully in the past).
The pseudocode for what you want to do is pretty simple:
1. Read in the values from the hardware.
2. Convert these into their equivalent keypresses or joystick functions.
3. Sleep or loop until your next cycle
I would start simple with a single button mapping to a single keypress or joystick operation and go from there. I have some simple examples at https://github.com/MHeironimus/ArduinoJoystickLibrary/tree/version-2.0 you can take a look at.
Good luck,
Matt
That's great Matthew thanks! I'll give it a try.
Gary
Hi there Mathew.
Really love your awesome library here. I finally manage to emulate 2 analog joystick with xy axis and xy rotation but I have a problem. The game I want to play with the joystick reads raw values only for positive values. But on the Windows game controller settings, it reads value of -32000 to 32000 for xy axis and -32000 to -10000 for xy rotation. Do you know any way to fix this?
@Nikolas - I would need to be able to reproduce the issue. What did you use to determine the game controller was reading values of -32000 to 32000 and -32000 to -10000?
This seems like a great alternative to using UnoJoy. I've been having difficulty getting that into DFU mode, so this reading HID-Compliant natively is sweet!
I was just wondering (and I haven't gone sniffing yet) if there were an easy way to change the name and image as they show up in windows?
@Christopher Joy - It is possible to rename the device, but I have not tried it yet. There is a discussion about this on the GitHub library at https://github.com/MHeironimus/ArduinoJoystickLibrary/issues/14.
I'm quite new to Arduino so on an upward learning curve. The Joystick v2.0 library is awesome and is going to allow me to achieve just what I want in the future. I have adapted some of the example sketches to create a test 4 x 4 matrix sketch which will be scaled up to a 32 button controller when it is fully working. I doubt I will win any prizes for efficiency but for the most part it seems to be working as expected with one exception.
#include // References Joystick library
const int outputPinStart = 2; // Constant that maps output pin start on the micro.
const int inputPinStart = 6; // Constant that maps input pin start on the micro.
int currentButtonState; // Declares the currentButtonState variable
int lastButtonState[4][4] = { // Last state of the button
{0,0,0,0},
{0,0,0,0},
{0,0,0,0},
{0,0,0,0}};
int buttonValue[4][4] = { // Controller button number
{0,1,2,3},
{4,5,6,7},
{8,9,10,11},
{12,13,14,15}};
Joystick_ Joystick(JOYSTICK_DEFAULT_REPORT_ID,JOYSTICK_TYPE_GAMEPAD,
16, 0, // Button Count, Hat Switch Count
true, true, false, // X and Y, but no Z Axis
false, false, false, // No Rx, Ry, or Rz
false, false, // No rudder or throttle
false, false, false); // No accelerator, brake, or steering
void setup()
{
for (int x = 2; x < 7; x++) // Initialize output pins
{
pinMode(x, OUTPUT);
}
for (int x = 6; x < 10; x++) // Initialize input pins
{
pinMode(x, INPUT_PULLUP);
}
Joystick.begin(); // Initialize Joystick Library
}
void loop()
{
for (int incRow = 0; incRow < 4; incRow++) // Loops through the output rows
{
for (int incCol = 0; incCol < 4; incCol++) // Loops through the output rows
{
digitalWrite(incRow + outputPinStart, LOW); // Writes the output rows with +5v
currentButtonState = !digitalRead(incCol + inputPinStart); // Checks the state of the input pin
if (currentButtonState != lastButtonState[incRow][incCol]) // Checks if the currentButtonState is the same as the lastButtonState
{
Joystick.setButton(buttonValue[incRow][incCol],currentButtonState); // Activates the contrller button
lastButtonState[incRow][incCol] = currentButtonState; // Saves the currentButtonState as the lastButtonState
}
digitalWrite((incRow + outputPinStart), HIGH); // Writes the output rows with 0v
}
delay(50);
}
}
My problem is that if button 1 is pressed, when buttons 2, 3, 4 are pressed everything works without problem and the Arduino Micro properties test show the correct buttons as lit, but if button 5 is pressed both buttons 1 and 5 lights go out. This also happens for buttons 2 and 6 and so on down the line. Clearly, I have a problem with my sketch but I have absolutely no idea what or how to correct it. Any help or guidance would be very much appreciated. Thanks in advance.
Peter Sanders - Your problem may be hardware related (not sketch related). Without seeing your hardware setup I cannot be certain, but it sounds like you might be experiencing "ghosting". The following article (towards the bottom) has a good explanation of the issue and ways to address it: http://pcbheaven.com/wikipages/How_Key_Matrices_Works/
Thanks Matthew, I did initially use that site to understand the concept but I guess I'm guilty of not reading the entire article. It does sound as if that may be the problem and I will experiment to see if it solves the problem. Many thanks for the pointer.
Matt, I'm pleased to feedback you were right with your suggestion I was encountering "ghosting". I have put a 1N4148 general purpose diode into the circuit for each button and everything works just as expected. Super simple fix and it gives me confidence that I am beginning to learn more about Arduino and the way it works. Thanks again for you swift and very helpful reply.
Peter Sanders - I am glad to hear I could help. Good luck on your project.
Boy this library is great. This is exactly what I was hoping for. Unfortunately my programming skills are abysmal compared to my fabrication skills. I'm trying to make a very simple handbrake. I can't seem to figure out how to isolate just one axis with a single potentiometer. I'd also like to add as many buttons as I can without the use of a matrix, just to keep it simple. How do I add just one functional analog axis and 12 buttons (I think that's my max input pins? It sounds pretty easy, but I have no idea what I'm doing, lol.
@C.J. - Be sure to check out the latest version of the library at https://github.com/MHeironimus/ArduinoJoystickLibrary.
I would use pins 2 - 13 and A1 - A5 (configured as digital inputs) for your buttons (which will give you up to 17 buttons) and use pin A0 as your handbrake.
I am a beginner with Arduino. Tried your library but in my setup only the joystick movement to the left side works. I am pretty sure it is something little I forgot...
Where can I configure the pins where the joystick is connected?
Where can I deactivate this A0 to GND thing?
At the moment the joystick is connected:
A0 + A1 for X and Y axis
D2 for the button
Thank you for your help!
As somebody who is brand new to Arduino and coding in general, how would I program 2 potentiometers using your joystick library?
I have it all working fine with different joystick monitoring and calibrating tools, but when I run my Windows program it doesn't see it. I connect a regular joysticks and the program sees it fine.
@autoworkhorse - You can create an issue in GitHub at https://github.com/MHeironimus/ArduinoJoystickLibrary/issues. Be sure to include details on how to reproduce your issue (e.g. version of Arduino IDE you are using, Arduino model you are using, Windows version, name of the program you are using, etc.).
Hi. I'm newbie in Arduino programming therefore I'm sorry in advance if this question may seem odd. I've tried Phil.Pf586 code, connected a POT to A0 and got Axis X and Axis Y moving together.
How can I define each axis individually?
Thanks.
@redforever - You will need to connect a second POT to A1 (or any of the other Analog input pins), read the value, and set the desired axis value (x or y).
Hi, Matthew.
Arduino Leonardo R3
Arduino 1.8.5
Windows 10
Firstly, I met new with Arduino and I do not have code knowledge. I'm a painter. I know electronics for hobby purposes. I like racing games and related equipment. I have a Logitech DFGT steering wheel. I added H-Shifter to steering. I do not use the steering's own pedals. I connected the pedals to the computer using my pedal set design and your software ... I use Hall Effect sensors instead of potentiometers on the pedals.
I set up 12 buttons with Gas, Brake and Clutch using ArduinoJoystickLibrary-version-1.0. The buttons were used for the H-Shifter.
However, I realized later that the resolution of these pedals was 8 bits.
That's why I wanted to do it again using ArduinoJoystickLibrary-version-2.0, but I was not successful. Since the coding is at the level of crawling, reading the library is like a dream for me at this stage ...
I share my codes below, which I set myself up for two weeks. How can I run these codes in 10bit resolution? I would be very happy if you could help me. Thank you.
#include
// Variable
int gas = A0;
int brake = A1;
int clutch = A2;
int gasValue = 0;
int gasValuebyte = 0;
int brakeValue = 0;
int brakeValuebyte1 = 0;
int brakeValuebyte2 = 0;
int clutchValue = 0;
int clutchValuebyte1 = 0;
int clutchValuebyte2 = 0;
// init joystick libary
void setup() {
// Initialize Button Pins
pinMode(0, INPUT_PULLUP);
pinMode(1, INPUT_PULLUP);
pinMode(2, INPUT_PULLUP);
pinMode(3, INPUT_PULLUP);
pinMode(4, INPUT_PULLUP);
pinMode(5, INPUT_PULLUP);
pinMode(6, INPUT_PULLUP);
pinMode(7, INPUT_PULLUP);
pinMode(8, INPUT_PULLUP);
pinMode(9, INPUT_PULLUP);
pinMode(10, INPUT_PULLUP);
pinMode(11, INPUT_PULLUP);
// Initialize Joystick Library
Joystick.begin();
}
// Constant that maps the phyical pin to the joystick button.
const int pinToButtonMap = 0;
// Last state of the button
int lastButtonState[12] = {0,0,0,0,0,0,0,0,0,0,0,0};
void loop() {
// Gas
gasValue = analogRead(gas);
if (gasValue >= 1) {
gasValuebyte = gasValue / 4 ;
}
else
{
gasValuebyte = 0 ;
}
Joystick.setThrottle(gasValuebyte);
delay(1);
// Brake
brakeValue = analogRead(brake);
if (brakeValue >= 1) {
brakeValuebyte1 = brakeValue / 4;
brakeValuebyte2 = brakeValuebyte1 - 127;
}
else
{
brakeValuebyte2 = -127;
}
Joystick.setXAxisRotation(brakeValuebyte2);
delay(1);
// Clutch
clutchValue = analogRead(clutch);
if (clutchValue >= 1) {
clutchValuebyte1 = clutchValue / 4;
clutchValuebyte2 = clutchValuebyte1 - 127;
}
else
{
clutchValuebyte2 = -127;
}
Joystick.setZAxis(clutchValuebyte2);
delay(1);
// Read pin values
for (int index = 0; index < 12; index++)
{
int currentButtonState = !digitalRead(index + pinToButtonMap);
if (currentButtonState != lastButtonState[index])
{
Joystick.setButton(index, currentButtonState);
lastButtonState[index] = currentButtonState;
}
}
delay(50);
}
Hi Matthew,
I cannot get my Pro Micro to appear as a game controller no matter what I do. I've even tried loading the v2 joystick libraries on to it. It's compiles fine but just appears as a keyboard and mouse. Very annoying to say the least.
Hi, thanks for your work, I am very new, how can I add more buttons to gamepad example, thank you very much.
I would love to give this a try, however I'm a proud owner of a Teensy++ 2.0.
Is there any chance to get the same thing done for the AT90USB1286 too?
Cheers!
Mike
This library is great!
How would I go about using JOYSTICK_TYPE_MULTI_AXIS if I wanted to map out 8-10 different axis? I plan on having more that 4 thumbsticks to 1 arduino as 1 joystick. It seems that the library is only set up for 2 axis (or 4 is you utilize the '.setZAxis' setttings). My apologies if my wording isn't correct, I'm very new to this. Thanks!
@Kiel Pease - I think eight is the maximum number of axis supported by the standard USB driver. I think if you want to get over 8, you would need to write a custom USB driver for your OS. You would also need an application that knew how to read over 8 axis.
More details: https://github.com/MHeironimus/ArduinoJoystickLibrary/issues/60
http://www.usb.org/developers/hidpage/HID1_11.pdf
@Matthew Heironimus - Thanks for the info and the fast response. I'll see what I can accomplish with just 8 axis.
I was wondering if there is a way to turn off controller emulation when a button is pressed, I have attempted this with Joystick.end() but can't get it to do anything at all. Any help would be greatly appreciated, the Joystick library is really nice!
Hi,
This library is very interesting but it is also a bit difficult to understand how this library actually works. Is there any tutorials which help us to get used to with this library?
Furthermore I would like to know does this library work with this kind of eBay device which I just bought happily without truly knowing that is it possible to use with this library?
The link to this joystick is here: https://www.ebay.com/itm/Black-Joystick-Potentiometer-JH-D202X-R2-R4-5K-10K%CE%A9-2Axis-Sealed-PTZ-Thermistor/223506698426?ssPageName=STRK%3AMEBIDX%3AIT&_trksid=p2060353.m2749.l2649
The model of this joystick is : Black Joystick Potentiometer JH-D202X-R2/R4 5K 10KΩ 2Axis Sealed PTZ Thermistor
There are plenty of these examples at the market. So I think that it is important that this library could potentially work with this device too. It seems to be very simple joystick based on the potentiometers having one fire button.
My plans are such that I will modify this joystick heavily to suit my needs. I will 3D model a decent stick for it and a base etc. in order to have a good flight stick with Elite Dangerous. It will then be 3D printed all this stuff.
But I need some help in order to make all this. I have no clue how to define different buttons with this library, how to define potentiometer based joystick with it etc. This seems to be a very unique style of library which is not nice for a new learner.
Anyway it is good and best to notice that it works nicely with win 10 as a gaming device all this if and only if the library is fully understood.
Please help me if you can and have time Matthew.
Hi,
I just wanted to say thanks.
I dropped this library in and I now have a 20 button controller that I can use in Elite Dangerous. From a coding perspective this took about 10 minutes, the physical build much longer :)
However, I am acutely aware that your library is doing all the heavy-lifting here and I just wanted to say thanks for putting in the time and effort.
All the best,
Gareth.
Hi Matthew - I noticed you have not responded for over a year so I hope all is well with you ?
My problem is that I am a sim racer and not a fabricator or programmer :(
I have copied a sketch (from here : https://www.thingiverse.com/thing:3043797 ) to use a wii fitboard load cell, HX711 loadcell amp and Arduino Pro Micro to use the loadcell as a brake.
When I compile and upload the sketch it works fine and I can do a calibrate from IDE and can see the value rising from 0 to over 30,000 with a lot of pressure on the loadcell.
But when I try to calibrate it in Windows or in my game (Assetto Corsa) it goes from 0 to +32767 by just touching it. Its like an on/off switch :(
I have nothing else added to the Arduino board, so no buttons or anything else.
Any ideas ?
Thanks
Ken
Hello Matthew,
I am currently building a collective for a helicopter controller. I use an Arduino Leonardo board for this. I need: 7 axes, 2 Hut switches and about 20 switches.
The programming of the Hut switches has now been achieved with the help of someone else on the Web. See http://hc625ma.org/ab412-collective-head/?unapproved=1379&moderation-hash=4156039c4b5a180d4a684babcb44afe5#comment-1379
I can also program the axes, but without problems I can program a 7th axis on e.g. pin 4?
Because of this I have 13 pins left for the switches. Is it possible to apply a button matrix (eg 4x5) in the same sketch? Possibly by using keypad.h Labrary? This means that 2 libraries are used!
I look forward to your response.
Fer
Hi!
I am using this lib for my Yoke system, works weel, I only have 2 issue so far, maybe someone could help:
1) how to recognize it as a driving wheel, so instead of X/ Y axis rotation the wndows setting page should show wheel rotation?
2) maybe it is not the libs failure and it is for any game controllers in wondos, but it does not show the correct throttle value until I change it.
So I have to push throttle each time startig the game or connecting device, canot leave it as set for a good neutral throttle for example for airplane start....
How to overcome those small issues?Ű
Thanks for the lib and tutorial!
1 - Try using the includeBrake and includeSteering options and the setSteering and setBrake methods. See https://github.com/MHeironimus/ArduinoJoystickLibrary for more details.
2 - You have to send at least one value to the host PC before it can know the value of the joystick. You can try sending an initial value to the host PC after you initialize the library and see if that helps your issue.
Dear Matthew!
Thanks for the reply!
I dig deeper and I hope those will be solved soon.
At the current state with my actual steering wheel conversion I've got a bit of challenge so need some days to test your suggestions.
Bt until that I have an other question you might help with.
I don't plan to use interrupts or send the state only when it is changed to the lib but simply using 'delay' in my loop and send actual state frequently.
How small/big delay is optimal for udpdating the state and sending sendstate so to communicate with the PC?
I think it is not good having very small delay in loop like delay(30) as there will be lots of data sent by the lib might not good for PC too, what is your experience?
Of course too big delay also would not be good to be able to control the game :)
I have lots of analog reading and conversion so have time for sure already consumed in my loop.
(It is out of scope here but I can share my current challenge: The wheel I am converting has not normal push buttons but soft rubber buttons having 8k resistance upressed for each button and work like an analog input when pushed in it reduces it sresistance until 3k and pushed harder to near 0ohm so I cannot make voltagge ladder to use one analog input for lots of buttons.
I have to buy io extender, replace buttons or only use 1 analog inptut for 2 buttons so more wires less ports free. Life is not that simple here :))
Thanks!
Dear Matthew!
I managed to use it as wheel now with my temporary butto solution, and if I don't include x axis just steering it shows the steering, but something strange as value jumps from left to right withut calibration.
I can only use steering if I run windows calibration wizard, but I am sure there could be some range which works without calibration.
I tried it with 0-1023 range and with 0-300 range as on your example with Joystick.setSteeringRange(0, 300);
and mapping 0-1024 to that intervall still no default calibrated center.
My wheel is centered at center range of the resolution as simple potentiometer.
Any solution to be able to pre-calibrate it so be plug and play with ranges windows likes?
Thanks!
p.s.: I could only try the lib on my old win7 computer win10 recognized leonardo as Android device not arduino :( also win7 shows this lonardo as unknown with this new library version but as I have an xbox360 controller I can reach the advanced setting as dialog is the same then I can select Leonardo for setting and calibration, but no game controller device icon for this leonardo, a bit strange but I am not soo lucky with IT :)
This Library is amazing, thank you! If it helps, I rejigged the GamePad example a little to make it easier to customise. I added Pin-to Button assignments on a per button basis and should allow the setup of a gamepad with relative ease. :-)
https://github.com/jamhamster/12-Button-Arduino-Gamepad
Absolutely brilliant library! Thank you so much for your work Matthew, it is truly appreciated.
Been playing with this over the week, works really well. Only I might be over looking something, and I'm hoping some can help clarify.
It says it has X, Y, and Z axis aswell as X, Y, and Z axis rotation and a Rudder & Throttle Axis.
So that's 8 axis?
However in the picture and in my tests I can only ever get 7 axis. X & Y, Z, X & Y Rot, Rudder & Throttle. Z Rot doesnt show up in the controllers settings. Is there something I am missing?
Hi Matthew,
I have set up a single encoder on a Leonardo and it is working fine according to Serial Monitor. My problem is that despite Joystick showing in Control Panel as gamepad/joystick, showing in Windows 10 joy.cpl and showing in my flight simulator calibration tool the encoder does not activate any of the test buttons or axes.
I had issues at first loading single joystick link, but did a new install of Arduino and it then worked.
The encoder is 3 pin wired to Pin 2 & 3 and ground as per encoder wiring instructions.
Any ideas would be welcome. I am on latest Arduino and your latest code.
Thanks
Robert.
Hi Matt,
Than you for this very useful resource. I have a question, I have a joystick with feedback (my own custom design). What can be done to receive feedback from the game to arduino, so it then can control joystick feedback?
Thanks
Henry
I have not added feedback functionality to my library yet, but others have. See https://github.com/YukMingLaw/ArduinoJoystickWithFFBLibrary for an example.
Hi Matt, I would use this sketch for my Home Cockpit that I use with MFS2020 or Xplane11, but I have a problem if I use a switch button.
if I connect a switch to the arduino micro and assign a function of the flight simulator to this switch (for example taxi light) I see that if I lower the lever of the real switch even in the simulator the lever of the taxi light is lowered, when I raise up the lever of the switch real, the simulated one does not react, it stays down.
If I lower the real one again, the simulated one finally gets up.
In other words, the virtual lever reacts to every two commands of the real one.
There is a way for solve this problem?
Thanks and ciao
Post a Comment